CLICK HERE FOR INDEX PAGE
 
DEVELOPMENT SECTION - JOINTS AND FIXINGS
V. Ryan © 2010
 

In the research section of your project you may have already considered a range of joints and fixings. This was probably generalised research. However, in the development section of the project you must decide exactly how you intend to join all the various parts together. You will need to select the joints and fittings carefully.


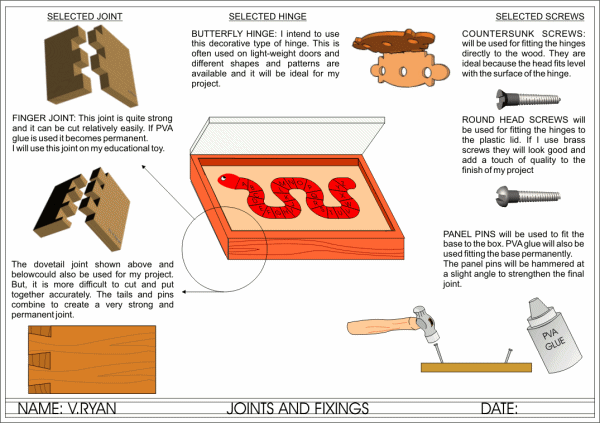
The sheet shown below shows an educational toy. The toy will be made using traditional craft skills as well as a range of materials including modern materials such as perspex.


1. On this development sheet you must clearly identify the joints and fixings you intend to use or could use effectively.
2. For every joint or fixing you select you must justify why it has been chosen. For example, if you choose to use finger joints rather than dovetail joints you could say that the finger joints are faster to mark out and cut. Furthermore, when combined with a modern glue such as PVA they are virtually indestructible
3. Do not include joints and fixings that are unsuitable or those that you do not intend to use. These should have been investigated and recorded in the research section of your project.
4. Make relatively detailed notes, mentioning your project and justifying the selection of each joint / fixing. Include keywords such as strength, cost, material and whether the joint or fixing is permanent or temporary / knockdown.
5. Consider traditional and modern joints, hinges, screws, panel pins and nails and name the types of glue to be used.
6. Keep your drawings clear and add enough detail to make it easy to understand how each joint or fixing will be used on the final project. Add colour and shade. You may wish to use a combination of three dimensional and two dimensional drawings. Choose a style of drawing you feel comfortable with and remember the examiner must be able to understand your drawings easily. Simple drawings are often the best type to use.


SUGGESTIONS:
A. Begin by drawing / sketching your final design in the centre of the page. Then plan the layout of the paragraphs and sketches that will surround it.
B. Do not copy statements/sentences or drawings from other pupils. Use your own words not those of a text book.
C. Carry out further research on joints and fittings and select the ones you intend to use.
D. Ask the teacher for advice and look at completed projects for more information on joints and fittings
E. Complete your homework on time. Do not fall behind as you may find it impossible to catch up.


CLICK HERE FOR MORE SAMPLE JOINT DEVELOPMENT SHEETS
 
FURTHER EXAMPLE OF A JOINTS DEVELOPMENT SHEET
 
CLICK HERE FOR DESIGN PROCESS INDEX PAGE
   
 
Google
 
Web www.technologystudent.com