| CLICK HERE FOR INDEX PAGE |
| |
| THE MORTISING MACHINE |
V.Ryan © 2022 |
| |
| PDF FILE - CLICK HERE FOR PRINTABLE WORKSHEET |
| |
| CLICK HERE FOR POWERPOINT VERSION OF WORKSHEET |
| |
One of the most useful machines in a woodworking workshop, is a mortising machine. It is a specialised piece of equipment, used to cut mortise joints and rectangular slots in wood. Mortise joints are often cut by hand (follow link for cutting mortise joints by hand). However, if a number of mortise and tenon joints are required, the mortising machine is quick, accurate and easy to use.
Marking out mortise joints is the same, whether they are to be cut by hand or by a mortising machine (follow link for marking out).
The mortising machine is often used to cut square or rectangular recesses, in the surface of wood (e.g. for hinges). |
| |
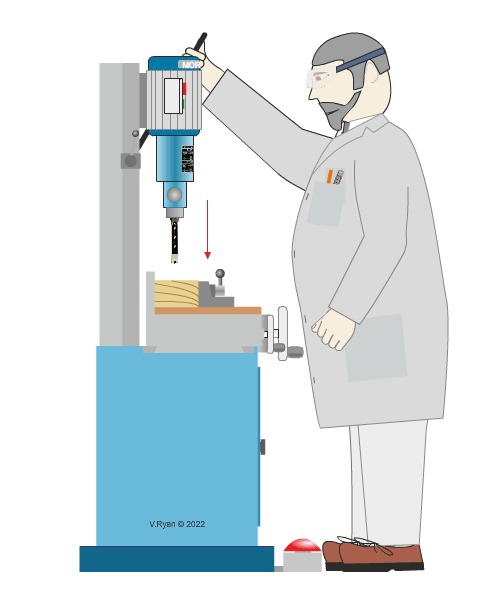
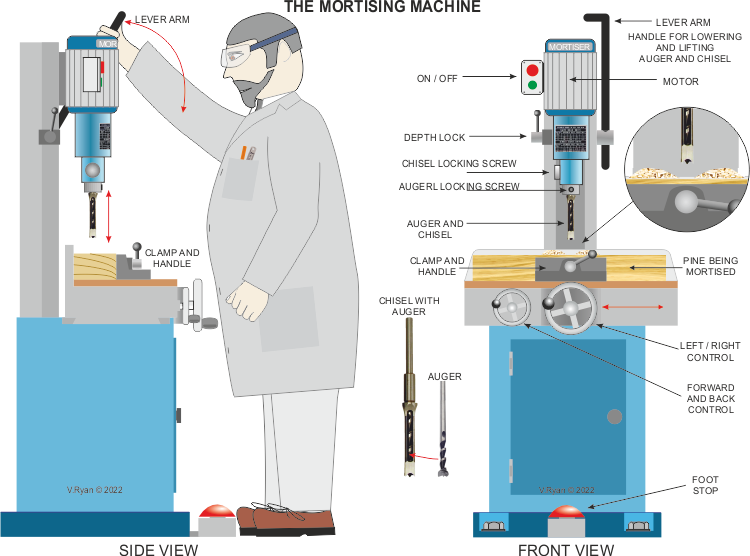
| The wood to be mortised, is secured by the ‘clamp’, which acts as a vice. Some machines have additional clamps, that ensure the wood does not lift from the table, during the cutting procedure. The ‘lever arm’ is pulled down by the machine operator, pressing the mortise chisel and auger into the wood, cutting the mortise. The procedure should not be rushed. A small amount of wood is removed, each time the chisel / auger is pressed into the wood. This repeated until the mortise / slot is finished. |
| |
 |
| |
|
|
| |
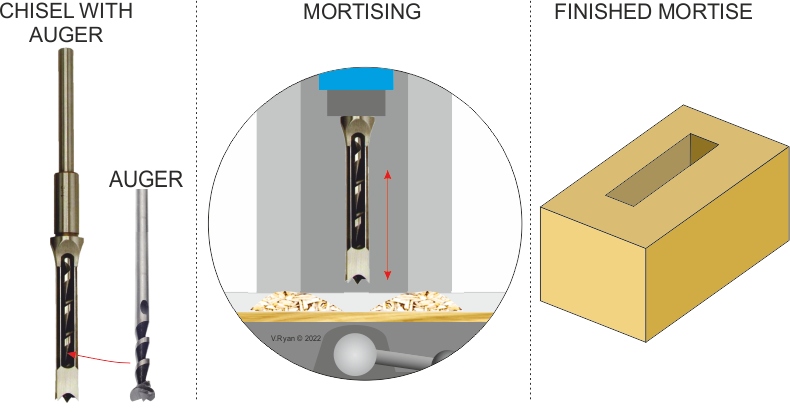
| The mortising machine looks similar to a machine drill, but there are several key differences. The cutting part is composed of an auger bit and a hollow chisel. The auger rotates inside the chisel and removes most of the waste material, as it spins. As the auger and chisel are pressed into the wood, the outer hollow ‘chisel’, produces the straight edges. The waste wood chippings escape to the surface, through slots in the hollow chisel. |
| |
 |
| |
| THE CLEARANCE BETWEEN THE AUGER AND HOLLOW CHISEL |
| |
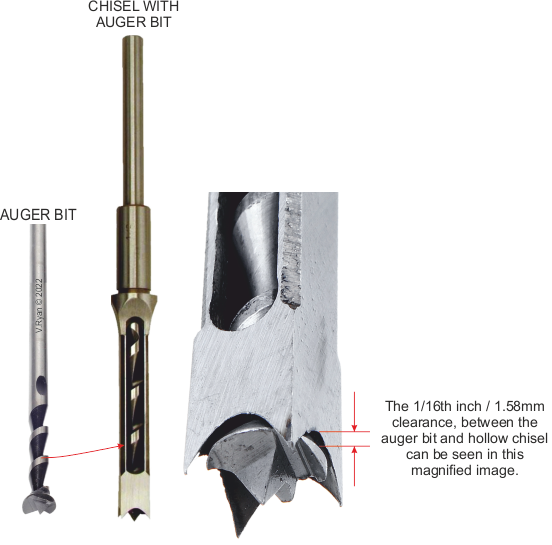
When using the mortising machine, the auger bit must go into the wood first, followed by the chisel, because the auger bit removes most of the waste wood.
To achieve this, there must be a small clearance between the auger bit and the chisel, at the cutting end (usually 1/16 inch = 1.5875 mm). When the auger bit rotates, it must not touch / rub against the hollow chisel. The clearance allows the chips to rise out of the mortise being cut in the wood and they are ejected through slots in the hollow chisel. Setting up the clearance distance depends on the make of mortising machine. (see diagram below) |
| |
| The slot through which the wood chippings are ejected, should face forward, when set up in the machine. This allows the chippings to the thrown out, away from the cutting area, ensuring a clear view for the machine operator. Also, the chippings are less likely to fall back into the mortise being cut. However, some machine operators prefer to position the slots to the side. |
| |
 |
| |
|
|
| |
| SETTING UP THE CHISEL AND AUGER |
| |
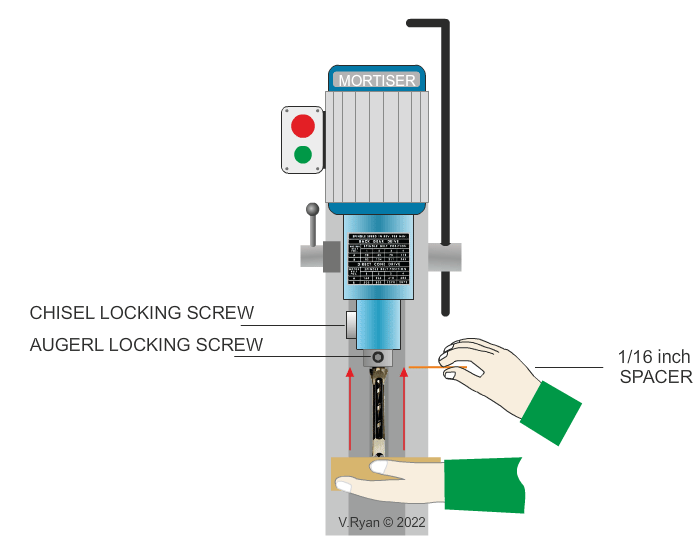
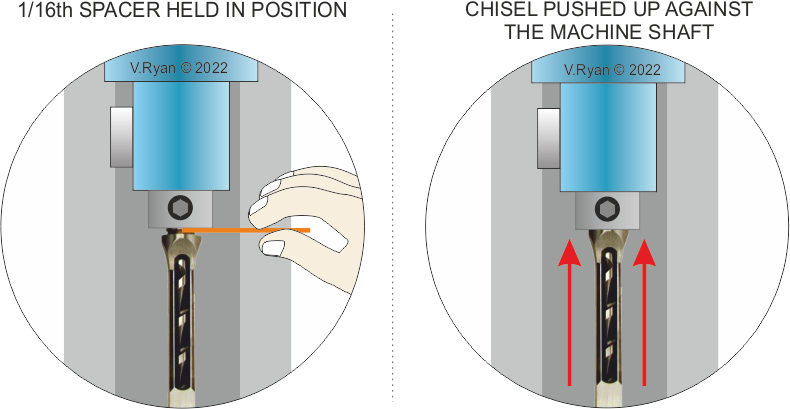
| Put together the auger bit and hollow chisel. Loosen both the chisel and auger locking screws. Using a piece of wood to support the auger bit and hollow chisel, push them upwards, into the vertical machine shaft. Before locking both parts in position, hold a 1/16th inch spacer (approximately the thickness of a penny coin), between the shoulder of the hollow chisel and the machine shaft (see diagram). Tighten both the locking screws. |
| |
 |
| |
| Then, loosen the hollow chisel locking screw slightly and push the hollow chisel right against the machine shaft. The auger bit should stay in exactly the same position. Tighten the chisel locking screw. This procedure should create the important clearance, at the other end of the chisel, between the sharp points of the hollow chisel and the cutting edge of the auger bit. |
| |
 |
| |
|
|
| |
| MAKING THE CUTS / MORTISE SLOT IN WOOD |
| |
 |
|
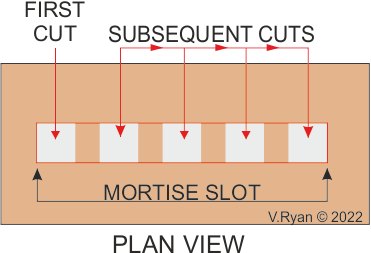
When chiselling a mortise, make a single plunge cut first, slowly pressing the chisel / auger into the wood, allowing the waste chippings to escape. Occasionally, withdraw the chisel from the wood, to allow it to cool and to allow waste wood to escape.
Leave a small gap between each cut and continue to the end of the mortise / slot. At this stage there should be a gap between each cut. Finally, remove all the wood between the first set of cuts. |
| |
| CLICK HERE FOR THE MORTISING MACHINE POSTER AS SEEN BELOW |
| |
 |
| |
| CLICK HERE FOR EQUIPMENT AND PROCESSES INDEX PAGE |
| |
|
| |
|