V.Ryan © 2022


| CLICK HERE FOR INDEX PAGE |
| MARKING OUT AND CUTTING - MITRE, CORNER HALVING JOINT |
V.Ryan © 2022 |
| PDF FILE - POSTER - HOW TO MARK OUT AND CUT A MITRE, CORNER HALVING JOINT |
| FIRST PIECE |
| Mark the width of the joint, as shown below. |
| Dia. A |
|
| Mark out the joint using a mitre square, creating a 45 degree line. |
| Dia. B |
|
| Use a try square to mark a line, half way down the side. |
|
| Set a marking gauge to half the width of the wood |
| Dia. C |
|
| Use a marking gauge to complete the marking out - the top and side. |
| Dia. D |
|
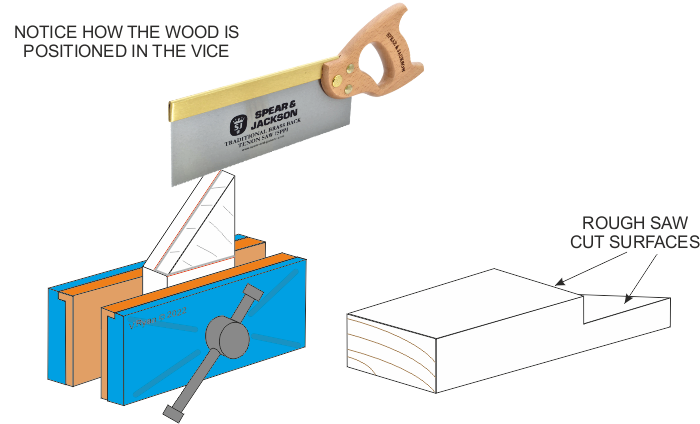
| Secure the wood in a vice. Saw down the ‘diagonal’ line, cutting on the waste wood side of the lines. |
| Dia. E |
|
| Turn the wood around in the vice. Make the final saw cut downwards, removing the waste wood. |
| Dia. F |
|
| Make the final ‘cut’ with a chisel. The chisel’s sharp edge, should be lodged in the line produced by the marking knife. Tap the chisel to remove the final waste wood. |
| Dia. G |
|
| SECOND PIECE |
| Mark out the joint using a mitre square, creating a 45o line. |
| Dia. H |
|
| Mark the waste wood with a pencil and remove it with a saw. |
| Dia. I |
|
| Use a marking gauge to mark half the thickness of the wood |
| Dia. J |
|
| Secure the wood in a vice. Saw across the line, cutting on the waste wood side. |
| Dia. K |
|
| Turn the wood around in the vice. Make the final saw cut downwards, removing the waste wood. |
| Dia. L |
|
| Make the final ‘cut’ with a chisel. The chisel’s sharp edge, should be lodged in the line produced by the marking knife. Tap the chisel to remove the final waste wood. |
| Dia. M |
|
| CLICK HERE FOR RESISTANT MATERIALS INDEX PAGE |
|